Last week the BCI Meeting was held, the major international conference on brain-computer interfaces. As with many other conferences, this edition was the first to be held virtually (with great results, organizers managed to maintain the interactivity between participants, one of the main reasons for a conference to be held in the first place).
Jelena Mladenović presented there our work on the effect of a biased feedback during a motor imagery BCI task. During the experiment, participants had to control a racing game by imagining right hand or left hand movements. Depending on the recognized brain pattern, the character would go either left or right, catching fish. I must mention at this point that said character is a hungry pingouin, Tux from Extreme Tux Racer.
Glimpse at a BCI Tux racing game (with an over-enthusiast participant)
There was three conditions during the experiment: the position of the character could be either positively biased (it was easier to reach targets), negatively biased (harder to to do), or there was no bias (control condition). The main outcome of the experiment is that depending on users’ profiles (e.g. if they are prone to anxiety), the bias could be either helpful or detrimental in terms of performance, learning or flow (an optimal state we can get into while fulfilling a task).
We are in the process of publishing the full paper, if you want to know more about the study the preprint (the version before peers review a paper) is available at: https://hal.inria.fr/hal-03233170.
You can also watch her 10 minutes talk summarizing the study right here:
Jelena’s talk during the vBCI 2021 conference
With this talk Jelena was awarded with a Best Presentation award − in the “non-invasive” category, because in this conference these is also cutting-edge research on invasive techniques, see all the abstracts.
This work was done in collaboration with Jérémie Mattout from Inserm (CRNL COPHY team) and Fabien Lotte from Inria (Potioc team), and we hope to continue our investigations in the foreseeable future (this is already our second study on the topic, previous publication here).
Teaser: we also used the data gathered during this experiment to investigate if it would be possible to automatically select the best bias over the course of a BCI application. And it looks like it, even with a simple selection algorithm. Check Jelena’s thesis for first insights (while the whole piece deserved to be read, this particular subject rests in chapter 5).
Fancy open-source game engines? Godot is among the main alternatives to the big names such as Unity or Unreal engine. Compared to the latter, Godot is free and comes with a MIT licence attached. Although tt is not on par in terms of functionalities and optimizations and you might not use it for creating the next triple A game, it still has plenty to offer. Godot comes with examples for desktop or mobile apps, it can do AR or VR, there is a physics engine for 2D or 3D scenes, you can use it to program shaders like grown-ups. Most of all, Godot can run on the Raspberry Pi and projects can embed Python code. With some hacks, that this tutorial is about.
The first part covers a basic Godot tutorial, using a python script to fetch data from the network and control a sprite. Part two dwells in more technicalities to (force) assemble python and the aarch64 Raspberry Pi.
The use-case will be to animate a cube with signals coming from the Lab Streaming Layer protocol (LSL for short). In the past years LSL has been widely adopted in research and among hackers to exchange physiological data between programs and between computers. It is a network protocol that ensure precise synchronization between streams, a must-have when dealing with signals such as EEG. More often than not there is a bridge between the acquisition devices and LSL, either from the manufacturers (e.g. Brain products, Emotiv, Neuroeletrics, OpenBCI) or from the community (e.g. Bitalino, Muse, generic BLE smartwatches) − more extensive list here. LSL is also supported by several program aimed at real-time signal processing, that you can transparently incorporate between the raw signals and your application (e.g. OpenViBE, Timeflux), and many tutorials exist around the web, including one dealing with Unity if you want to stick with the cool kids. For the sake of the tutorial we will use generated data so you don’t need an actual device to follow through.
LSL comes with various bindings (C, C++, C#, Java, Python and so on). Beside C and C++ there are no “pure” implementation of LSL, meaning that all bindings rely on a native library, which has to be compile against each target platform (also a reason why at the moment a browser implementation is problematic). Godot main programming language is GDScript, developed especially for it. It is fortunately possible to incorporate external library through GDNative. Because Godot is in the process of integrating C# as a second scripting language, the easy solution would be to use the C# LSL binding for our project. Easy is no fun, and despite C# existing code base, for learners as well as in the research community Python is king, with many libraries in signal processing, image processing, statistics, audio, and so on. Hence the objective will be to harness the power of Godot with the flexibility of Python.
We are lucky, an unofficial and yet active project exists to do just, that godot-python. There are some caveats in terms of packaging, that we will tackle later on; apart from that it just works, you can interface Python code with the scene in Godot, to control objects for exemple, and several languages can co-exist in the same project. Godot-python relies itself on another project to provide a standalone Python environment: python-build-standalone. A standalone Python can be shipped alongside the Godot project to run on final user’s computer, and it will not interfere with any Python installation present on the system. All is fine, then? Almost. Remember the premise, aiming at running the software on a Raspberry Pi? Those single board computers are tiny and cheap, perfect to lower the entry barrier for computer science and, here, disseminate biofeedback applications. Except that it relies on a different CPU architecture than traditional PC, ARM (as the newer Apple M1) instead of x86.
We are again lucky (or, more accurately, we can benefit from a positive open-source ecosystem), an unofficial and yet active project exist to facilitate ports of Godot to such machines: FRT. There is a second project more focused on the Raspberry Pi, but it does not seem to support GDNative (hence third party libraries such as LSL), so we will stick with FRT. Even though FRT does not aim at providing the Godot editor (the environment used to program the application), it provides scripts and binaries for running the Godot platform, the component use to run the application. Think of this second binary as an “interpreter” for the scenes created in Godot. When a project is being exported, the interpreter specific to the target platform is packed with the scenes, assets and scripts.
On the one hand we have godot-python to run python code within Godot, on the other hand we have FRT to run Godot on the Raspberry Pi, all is fine, then? Almost. Never before godot-python ran on Raspberry Pi (or an any ARM system for what matters); we are about to change that.
The tutorial is tested on a Raspberry Pi 4 (2GB RAM), with Raspberry Pi OS (2020-08-20), itself a derivative of a Debian Buster 10.5. Programming within Godot Editor occurred on a more regular laptop, an ol’ (k)Ubuntu 16.04 x64.
Part 1: Python and LSL in Godot
In this first step, we will create our scene in Godot, install and configure Python so we can retrieve LSL signals, animate an objects with it.
First sprite
First things first, grab the Godot editor for your (desktop) platform (tested with release is Godot 3.3.2). You can save yourselves the extra space taken by C# and Mono integration and download the ~35MO of the archive (did I mention that Godot is very lightweight? Pleasant change compared to competitors). Note: if anyone reproduce this tutorial with the Mono version and run Godot plus Python plus C#, (“Godot babel”?), feedback is welcomed.
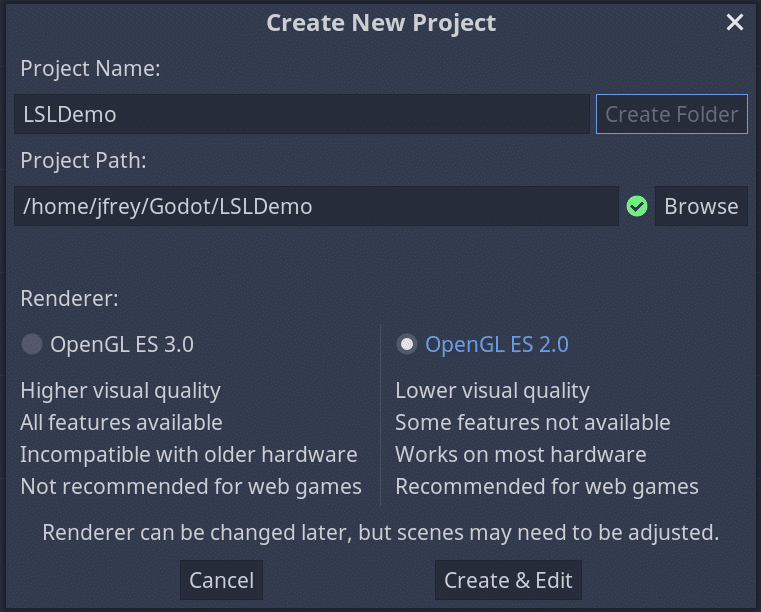
One binary in the zip file, launch Godot and start with a new project. Select “OpenGL ES 2.0” as the renderer, ensuring better compatibility with the Raspberry Pi we will use later on. Lacking inspiration when it comes to titles and names, the project will be called “LSLDemo”.
Creating a new Godot project
Other tutorials dedicated to Godot will to a better job at guiding you in creating a 3D project, for the sake of simplicity we will stay two dimensional on this one. Click on “2D scene” on the left-hand sideo of the window to create the root node of the scene. You will switch to a 2D plane in the main view. Right click on the Node2D root node, “Add Child Node”, look for and select “Sprite” in the list, an element used to represent a character or an object that can move on screen. We will associate an image to it. It can be anything, because we will have it turning and turning around, let’s download a PNG of a Bee on Wikimedia. Direct access to 320×240 version here. Save the PNG file on your disk. To add the image to the list of ressources available to the project, drag and drop the image file in the editor window. You should now see the image appear in the bottom left dock under the main folder res://.
To associate the image to the sprite, selecting the Sprite node, click on the “Texture” property situated on the left-hand side of the editor (at the moment marked “[empty]”) and select”Load” in the drop-down menu. A window will appear listing all the resources, including the bee image, select it, validate your choice and close the menu with “Open”.
Let it bee the first sprite!
Now is a good time to safe your scene, (“Scene”, “Save Scene” or the obvious Ctrl+S shortcut). Scenes have the tscn extension, we will only have one, let’s name it… “main”. Launch the scene to see how it looks for now (pres “F5” or click on the “play” arrow on the upper right). Godot will ask you confirmation that current scene is the main scene (it needs to point to one scene upon launching the game). In the new window, that shows what players would see upon lauching the game, only part of the sprite will be displayed. Indeed, by default the sprite was centered around the (0, 0) coordinates, and by convention the origin is the upper left corner of the screen. Go back to the editor, ove the bee so that you can see its entirety, either using the mouse (left click, drag and drop) or by changing the “Node2D” property of the sprite. You can also scale the size of the sprite or rotate it.
Installing and testing godot-python
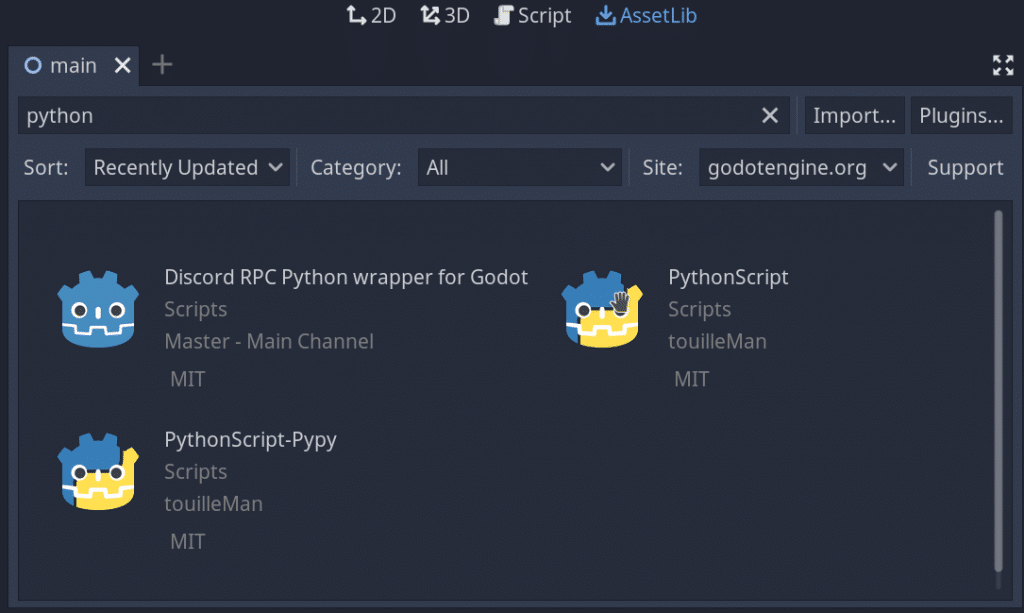
On desktop and within the editor the simplest solution to install godot-python is to download it from the “AssetLib” tab (upper part of the screen). Search for “python” and pick “PythonScript”. It’s version 0.50.0 as for now. Select, click on “Download” in the new window, wait for the file to download in the AssetLib tab, click “Install” once done. The asset weights about 100MB as of v0.50.0, it contains the whole Python ecosystem for the four supported platforms. Upon installation, in the file list, you might want to un-check platforms you don’t plan to use during development and only keep yours (e.g. pythonscript/x11-64 for Linux), but it won’t hurt to keep everything. Wait for the asset to uncompress. It will reside in the addons sub-folder of the Godot project. As per instruction, you must close Godot and relaunch the project for godot-python to be properly installed. Do that, save if asked to.
python-godot is avaible from the AssetLib tab under the name PythonScript
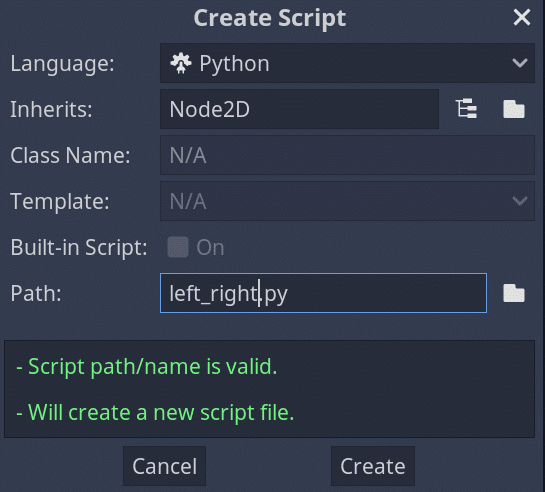
To test the Python environment, go to the “Script” tab, click “File”, “New Script…”. Similarly to other engines, a script in Godot is attached to an object (a node). This one will change the position of the sprite, which is a property inherited from the “Node2D” class, that you will enter in the “Inherits” field. After setting the name of the script (here left_right.py, as we will translate the sprite back and forth), hit “Create”.
Creating a test python script
The python script comes with a default code. There should be one method _ready(), which will be called upon initialization of the class. The ready() method of each class will be called upon loading a scene, any blocking call here will delay or freeze the spashscreen when you first start the game. The should also be two class variables at this stage. For example a = export(int) declare a (integer) variable that will be accessible within the editor, very handy to easily set parameters to different nodes even if they share the same script. In our first code we will use an “exported” variable to set the speed of the sprite. To update the sprite we will need to add a new method _process(), that will be called upon each rendering loop by the engine. The python layer expose various variables, including the current position of the sprite. The idea is to save the initial position upon launch, and move the sprite from left to right with a configurable step between each loop. Coordinates will be handled through the Vector2 object and we will use a direction flag to switch from left to right. Borders will be hard-coded, let’s be a bit dirty. Simple enough to check that python runs correctly. The full code left_right.py is as follow:
from godot import exposed, export, Node2D, Vector2

@exposed
class left_right(Node2D):

	# translate node that many pixel each loop, variable exposed to editor.
	step = export(int, default=10)
	# initial position of the node
	init_pos = Vector2(0,0)
	# flag to switch from left to right
	direction = 1

	def _ready(self):
		"""
		Called every time the node is added to the scene.
		Initialization here.
		"""
		# save initial position
		self.init_pos = self.position

	def _process(self, delta):
		"""
		Called for each rendering. Main code here.
		"""
		# when the node goes to much on the left or on the right, revert direction
		if self.position.x > self.init_pos.x + 100:
			self.direction = -1
		elif self.position.x < self.init_pos.x - 100:
			self.direction = 1
		# apply translation change
		self.position += Vector2(self.step * self.direction, 0)
To associate the script to the sprite, within the editor drag and drop the file to the Sprite node (or right click on the Sprite node, select “Attach Script”, choose Python and select existing file). There are many area of improvements, for exemple delta could be use to smooth animation even if the framerate varies, but if you launch the scene, you should see a buzzing bee. Note that fore some reason the variables exposed by the Python script are not updated in the editor before you restart the project (“step” will not appear in the “Inspector” dock on the right). One bug, probably more to go.
Controlling a sprite with LSL
Those interested in next-gen biofeedack applications will have jumped right here. This time the objective is to fetch link the movement of the sprite with input coming from a LSL stream. To do that we will use one script to generate the data. This script is to be ran outside Godot, within your usual Python environment, or on another computer of the same network (Note: it should be possible to exchange signals through Internet as well, but it requires dwelling in LSL configuration, out of scope). If you never used LSL before, install it through pip: python3 -m pip install pylsl (possibly add the --user flag depending on desired scope). It should fetch the last version on desktop, 1.14 (which contains noticeable improvements in terms of CPU consumption compared to the previous ones).
Coordinates in a 2D space: two channels. To have the bee moving circles, sinus and cosinus of the same input. The simplest code to achieve this result (do not hesitate to grab more interesting bits from the official examples) to be included in a SendDataSin.py:
"""
Example program to demonstrate how to send time series to LSL
"""

import math, time

from pylsl import StreamInfo, StreamOutlet, local_clock

if __name__ == '__main__':
    # Sampling rate, on par with usual vsync framerate
    srate = 60
    # Identifier of the stream. Usually the name describe the device / model used, the type what data is being sent. Sticking with traditional examples values.
    lsl_name = 'BioSemi'
    lsl_type = 'EEG'

    # A stream info describe the meta data associated to the stream. We create two channels (x and y translations) of floats.
    # The last parameter is an ID that should be unique, used to automatically reconnect in case the stream is interrupted.
    info = StreamInfo(lsl_name, lsl_type, 2, srate, 'float32', 'myuid1337')

    # The outlet is the actual "pipe" outputing data, running in a separate thread
    outlet = StreamOutlet(info)

    print("now sending data...")
    # Infinity and beyond
    while True:
        # Prepare and send data
        mysample = [math.sin(local_clock()), math.cos(local_clock())]
        outlet.push_sample(mysample)
        # Wait before next push.
        # Note that relying on time.sleep to set the effective sampling rate (how many samples are sent per second) is sub-optimal, it will likely be slower and unstable
        # Check official LSL examples for a better way to steadily send data, e.g. compute how many samples are needed between two loops.
        time.sleep(1./srate)
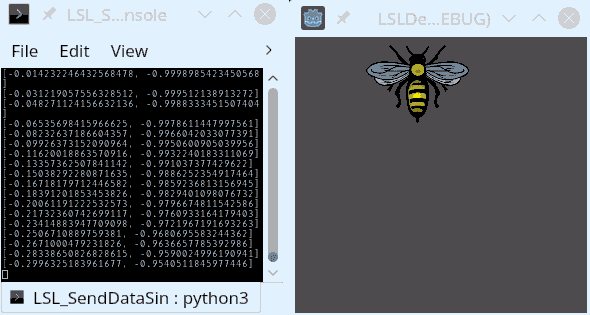
There are many options related to LSL, the most important for performance being the buffer size (both on outlet and inlet) and the number of samples sent at once − check the well done documentation. If the system becomes laggy or unresponsive, the culprit is probably there. Run python3 SendDataSin.py and leave it live the big dream in the background. Now that we send data, we can take care to retrieve data within Godot.
First you need to also install LSL within the godot-python environment. Launch a terminal (we are still outside of Godot for now), and navigate to your Godot projet folder, e.g. LSLExemple. Still assuming that you are using Linux, Python binaries are located in addons/pythonscript/x11-64/bin (switch x11-64 for windows-64 or osx-64 accordingly to your situation). Most probably when the asset was installed the executable flag was not preserved. Fix that with chmod +x ./addons/pythonscript/x11-64/bin/* Now you can execute the standalone Python environment directly. Because the soft link were not preserved as well, we will have to aim at the exact Python version used (e.g. python3.8 rather than pyhton3). Install pip itself with ./addons/pythonscript/x11-64/bin/python3.8 -m ensurepip (you can also cd directly to the bin folder, I keep the path for clarity). Finally, as you did before with your own installation, to install LSL run ./addons/pythonscript/x11-64/bin/python3.8 -m pip install pylsl
On desktop not only pip will retrieve the corresponding .py files, but it will also fetch locally the .so library (or .dll or .dylib, each system its beloved extension). This subtlety will come handy in next part on Raspberry, because it won’t do that properly. Note that if you plan to use other libraries you will need to install them likewise, and you will have to do so for each target platform (there is no automatic process at the moment to do so). If you create another project, you can copy over the addons folder to keep all installed modules.
Now that everything is ready for Python to use LSL, head back to the Godot editor. Create a new script, still Pyhton, still inheriting from Node2D. Let’s call this one LSL_translations.py. The script will ressemble left_right.py, except that it will import the LSL module (you can import anything you have installed!) and fetch data from SendDataSin.py script. The translation will be applied to both X and Y axis.
from godot import exposed, export, Node2D, Vector2
from pylsl import StreamInlet, resolve_bypred

@exposed
class LSL_translations(Node2D):

	# magnitude of the applied translation
	factor = export(int, default=100)
	# initial position of the node
	init_pos = Vector2(0,0)
	# flag to switch from left to right
	direction = 1
	# LSL input stream
	inlet = None

	def _ready(self):
		"""
		Called every time the node is added to the scene.
		Initialization here.
		"""
		# save initial position
		self.init_pos = self.position

	def check_stream(self):
		"""
		Try to find the LSL stream on the network. Change predicate depending on target.
		WARNING: due to timeout option will block execution for the whole Godot engine upon each request.
		TODO: use threads to prevent blocking calls.
		"""
		if self.inlet is None:
			print("looking for stream init")
			streams = resolve_bypred("type='EEG'", timeout=0.1)
			if len(streams) > 0:
				# create a new inlet to read from the stream
				self.inlet = StreamInlet(streams[0])
				print("got stream")

	def _process(self, delta):
		"""
		Called for each rendering. Main code here.
		"""
		self.check_stream()
		if self.inlet is not None:
			# fetch data from inlet
			data, _ = self.inlet.pull_sample(timeout=0)
			# To maximize responsiveness, pull until last value in the buffer
			# Note: input with very high bandwidth might block forever execution here.
			while data is not None and len(data) >= 2:
				# expect two channels, translation from the initial position for X and Y.
				self.position = self.init_pos + Vector2(data[0]*self.factor, data[1]*self.factor)
				#print("got value: %s" % str(data))
				data, _ = self.inlet.pull_sample(timeout=0)
If you launch the scene and still SendDataSin.py is still running, you should see the bee hovering around its initial position. Well done! If you want to change the radius of the circle, tune the factor property (remember to restart Godot for any exported variables to be reflected in the editor the first time you add or change them). As indicated in the comments there some limitation and caveats with such simple code; we covered the basics, your turn to shine with actual physiological signals. Exporting the project (a toned down version of it due to the limitations of godot-python) is covered below.
It’s alive! Sending data from the network with LSL to a sprite rendered with Godot engine
Part 2: running a python Godot project on the Raspberry Pi
You mastered Godot, python and LSL. Next challenge: reproduce all of that on the single board computer. People only interested in having Python scripts with Godot on the Pi, welcome!
godot-python for Raspberry Pi and aarch64, long version
Godot-python needs to be modified to account for the “aarch64” platform that we will use (64-bit version of the ARM). The long route is to go back to the godot-python source and compile it on a Raspberry Pi. Fetch the source code, change lines in platforms/x11-64/SConscript, pythonscript/SConscript and site_scons/site_tools/cython.py to reflect that we update python-build-standalone from the Python 3.8 currently used to Python 3.9, for now the only version of Python supported by python-build-standalone on aarch64 Linux. Basically track down all “3.8” and “38” entries in those three files to substitute “3.9” and “39”.
Godot-python points to a python-build-standalone binary. Even by following carefully the instructions I did not manage to compile from scratch python-build-standalone (same symptoms as this bug issue), instead I retrieved automatic builds from its continuous integration (there is not yet official builds on the the “release” page). You will need to log in with a Github account to see the artifacts produced by the continuous integration. Fetch the output of the build of interest cpython-3.9-aarch64-unknown-linux-gnu, extract one of the tar.zst archive − I picked the version with optimizations enabled at compile time, suffixed “lto” −, place the archive in the file system and point godot-python to the right location by changing the variable PYTHON_PREBUILD_URL in platforms/x11-64/SConscript, pythonscript/SConscript, e.g. PYTHON_PREBUILD_URL = "file:///tmp/cpython-3.9.5-aarch64-unknown-linux-gnu.tar.zst".
The shorter route is to retrieve the patched code directly from our fork (in the future it will be a better option to create a dedicated version and merge changes back upstream to be in sync with latest modifications). Follow then the repository instructions to actually build godot-python. Compilation will still take hours, and stress the memory of the Raspberry Pi. I had to increase the swap size to its maximum for the compilation to success. To do that disable current swap sudo dphys-swapfile swapoff. Edit /etc/dphys-swapfile with your preferred editor (that would be Emacs and evil-mode), set CONF_SWAPSIZE=16384 and CONF_MAXSWAP=16384. 16GB of swap will take that much space on the SD card, check you have enough free space. Actually with these parameters we must hit a limit because on my system “only” about 12GB were allocated. And it barely sufficed to compile godot-python (I first tried and failed with both 2GB and 8GB) Allocate sudo dphys-swapfile setup and enable swap sudo dphys-swapfile swapon. (Best revert the changes after the compilation is done).
godot-python for Raspberry Pi and aarch64, short version
At this stage you have a Godot project (no need to change the beautiful scene you came up with in the first part) and a godot-python addon for the Pi. Next: Godot on the Pi. This step will be easy, FRT proposes binaries ready to employ on its sourceforge repo. You can of course recompile if you with some specific options or optimization; I went not there. Download the frt_100_332.zip archive of the 1.0.0 version (last one as of today, tested with a project made with, indeed, Godot 3.3.2). Extract, pick for the Raspberry Pi 4 the file frt_100_332_arm64.bin (arm64 is synonyme to aarch64). Note: if you aim at 32bit distributions, you are on your own! The FRT project contains information graphic driver available, head there if you want to optimize user experience, especially if you go 3D.
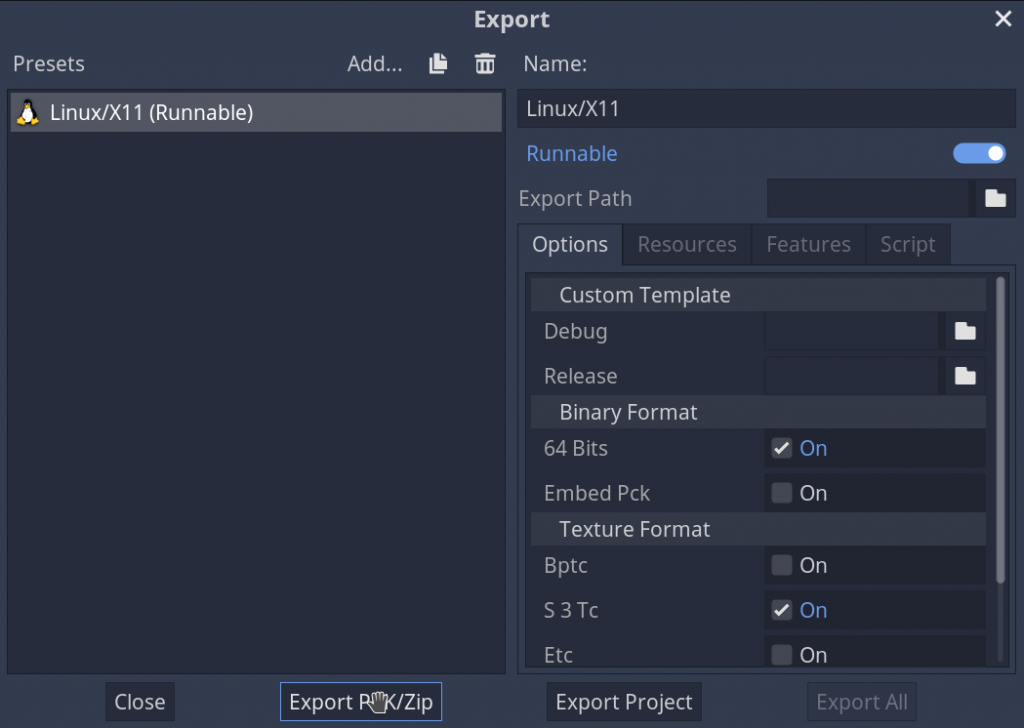
frt_100_332_arm64.bin will be your “interpreter”, or “launcher”, for the Godot project. A normal way to proceed would be to use this file as a template in the Godot editor to neatly package everything in one binary, cipher a bit, but godot-python cannot be packaged that way. Instead we need to export the Godot project as a Zip package. So we will just do that. On the desktop, in the editor, select “Project”, “Export…”. Add a a preset, select Linux/X11. You don’t have to touch any option, hit “Export PCK/Zip”. Enter a filename ending with .zip, e.g. LSLDemo.zip. Export to a location outside the project folder to keep it tidy.
Exporting Godot project as Zip archive
Transfer the zip file to the Raspberry Pi (I personally favor scp). Create a folder to hold your project, and extract the zip file in there. Do not make stupid mistakes like myself, such as erasing the .import folder (it is not decorative and you would loose like an hour getting over weird “ressource not found” errors). Copy frt_100_332_arm64.bin in the project folder. If you run the binary, it should detect the project automatically and try to launch it. It will fail because there is no addons folder at all in the zip file; except for pythonscript.gdnlib (the file indicating to Godot where to fetch the native library that is used as an interface with the standalone Python) the godot-python asset was not copied over during export. And even it it were, we would end up with the wrong architecture.
Importing custom godot-python to the project
In the previous episode the addons folder was obliterated. All hope in not lost: we happen to have retrieved a godot-python archive tailored for the Raspberry Pi. Extract godot-python-0.50.0+dev-x11-64_aarch64.tar.bz2 (it will be minus “aarch64” if you compiled it yourself) in the Godot project folder (reminder: the command line is tar xvf). It will create an addons folder with everything needed to run python in Godot, we are back on track. Because FRT declares a new platform upon compilation, we have to tune pythonscript.gdnlib so it can link our version of the Godot “interpreter” with our version of godot-python. Edit the file and under the section [entry] add the line FRT="res://addons/pythonscript/x11-64/libpythonscript.so" (you can leave the other entries). Now if you run ./frt_100_332_arm64.bin the program will start, the scene should load, but an error will be raised because LSL cannot load. Damn, we left it on the side of the road!
Note: on my system I am also spammed by messages about “ALSA lib pcm.c:8424:(snd_pcm_recover) underrun occurred”, probably some configuration to perform around ALSA or PulseAudio, you can disable audio altogether with the parameter --audio-driver Dummy
LSL: the last stand
To install LSL within the Python environment of our Godot project now on the Pi, we need to reproduce earlier steps. Namely, in the project folder on the Pi run ./addons/pythonscript/x11-64/bin/python3.9 -m ensurepip and ./addons/pythonscript/x11-64/bin/python3.9 -m pip install pylsl (notice the change to python3.9).
Did you think it would be enough? Of course not. Not only acute eyes will have seen that the LSL version downloaded on the Pi is an old 1.12.2 (and we do want this shiny 1.14, especially on the Pi), but even if you tried to go forward, you would face an error: current pip package of pylsl does not include a build for ARM. Hopefully this will be fixed in the future, in the meantime you need to grab the proper version.
Either retrieve the last stable release of the LSL sources, install some basic packages on the system to ensure compilation, such as build-essential and libboost-dev, run the standalone_compilation_linux.sh script and wait a couple minutes for the liblsl.so to be backed. arrive.
Or fetch directly the compiled file from there. No matter the solution, copy the .so file to the Python environment, overwriting the “faulty” file, e.g. in the project folder cp liblsl_aarch64_debian.so addons/pythonscript/x11-64/lib/python3.9/site-packages/pylsl/liblsl64.so (we mix a 1.12.2 API with the 1.14.0 library, not ideal but good enough for now, if necessary you can also manually update the python overlay).
[update] As of 22/05/05, latest versions of pylsl changed the way they look for the LSL library. They will try to load from the system install, not the local python install. If pylsl does not work for you on the Pi, with error messages related to the location of the library, here is a quick and ugly fix: force the installation of an older version that is still available on ARM: ./addons/pythonscript/x11-64/bin/python3.9 -m pip install pylsl==1.12.2 A better solution is for sure to install the compiled .so somewhere in LD_LIBRARY_PATH, I’ll have to test that, comments are welcomed if you do.
Now everything should finally be in place. If the SendDataSin.py script is running on the Pi (or on your desktop computer, should both machine be connected to the same Wifi), and if you launch the FRT binary (from ssh DISPLAY=:0.0 ./frt_100_332_arm64.bin), you should be met with excitation by the bee, happily circling forever after.
Conclusions
This is it, you tamed Godot, Python and LSL, conquered Raspberry Pi. The tutorial is still rough on the edges − finger crossed that it will become outdated soon, with Python and ARM officially supported in Godot at some point −, and yet it opens doors for creating quick prototypes. You can now add few assets, some lines of code and start creating environment that can respond in real time to physiological signals, plugging it to any screen or projector.
Plugging our breathing belt to Godot and Raspberry Pi
This tutorial is nothing more than gluing existing blocks produced by the community, thanks to those behind each one of them!
Do not hesitate to comment below or e-mail us if some instructions are unclear, if we blatantly missed something or if you cannot reproduce the tutorial. We do not aim at supporting the whole pipeline, but we will do our best to help. And if you produce something out of this page, we are also eager to know about it 😉
This project started as a(nother) collaboration with the Potioc research team, and the then-post-doc Joan Sol Roo. Through this projects we wanted to address some of the pitfalls related to tangible representations of physiological states.
At this point we had been working approximately 8 years on the topic, creating, experimenting with and teaching about devices using physiological signals; while at the same time exchanging with various researchers, designers, artists, private industries, enthusiasts or lay users. We started have a pretty good idea of the various frictions points. Among the main issues we encountered: building devices is hard, even more so when they should be used outside of the lab, or given to novices. We started to work more on electronics because of that, for example relying more on embedded displays instead of spatial augmented reality, but we wanted to go one step further and explore a modular design, that people could freely manipulate and customize. We first started to wonder what basic “atoms” were necessary to be able to recreate our past projects. Not so many it appeared. Most projects boil down to a power source, a sensor, some processing, an output, no more. Various output can be aggregated to give multi-modal feedback. Communication can be added, to send data to or receive from another location, as with Breeze. Data can be recorded or replayed. Some special form of processing can occur to fusion multiple sensors (e.g. extract an index of cardiac coherence) or to measure the synchrony between several persons, as with Cosmos. And this is it, we have or sets of atoms, or bricks, that people can assemble in various way, to redo or create new devices. Going tangible always comes with a trade-off in terms of flexibility or freedom as compared to digital or virtual (e.g. it is harder and more costly to duplicate an item), but it also brings invaluable features, with people more likely to manipulate, explore and tinker with physical objects (there is more to the debate; for another place).
We are of course not the firsts to create a modular toolkit; many projects and products provide approach to explore electronics or computer science, and the archetypal example — that is also a direct inspiration –, comes from the Lego bricks themselves. However we push for such form factor in the realm of physiological computing. More importantly, we use the properties of such a modular design to answer to other issues pertaining to biofeedback applications: how to ensure that the resulting applications empower users and do not enslave them?
Throughout the project, we aimed at making possible to interact with the artifacts under the same expectations of honest communication that occur between people, based on understanding, trust, and agency.
Understanding: Mutual comprehension implies a model of your interlocutor’s behavior and goals, and a communication protocol understand- able by both parts. Objects should be explicable, a property that is facilitated when each one performs atomic and specific tasks.
Trust: To ensure trust and prevent artifacts to appear as a threat, their behavior must be consistent and verifiable, and they should perform only explicitly accepted tasks for given objectives. Users should be able to doubt the inner workings of a device, overriding the code or the hardware if they wish to do so.
Agency: As the objective is to act towards desirable experiences, control and consent are important (which cannot happen without understanding and trust). Users should be capable to disable undesired functionalities, and to customize how and to whom the information is presented. Objects should be simple and inexpensive enough so that users can easily extend their behavior.
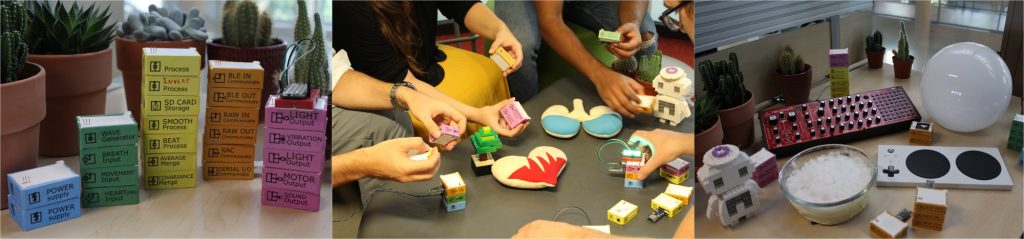
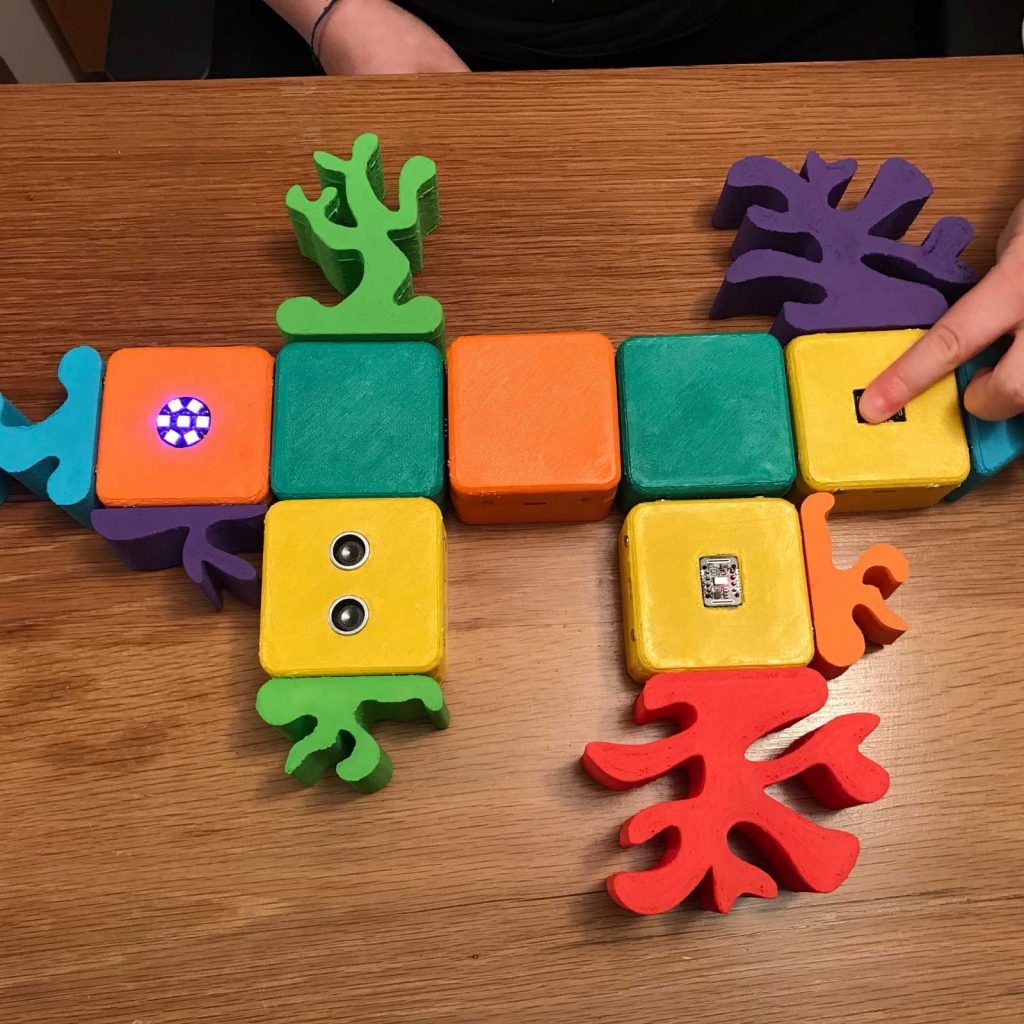
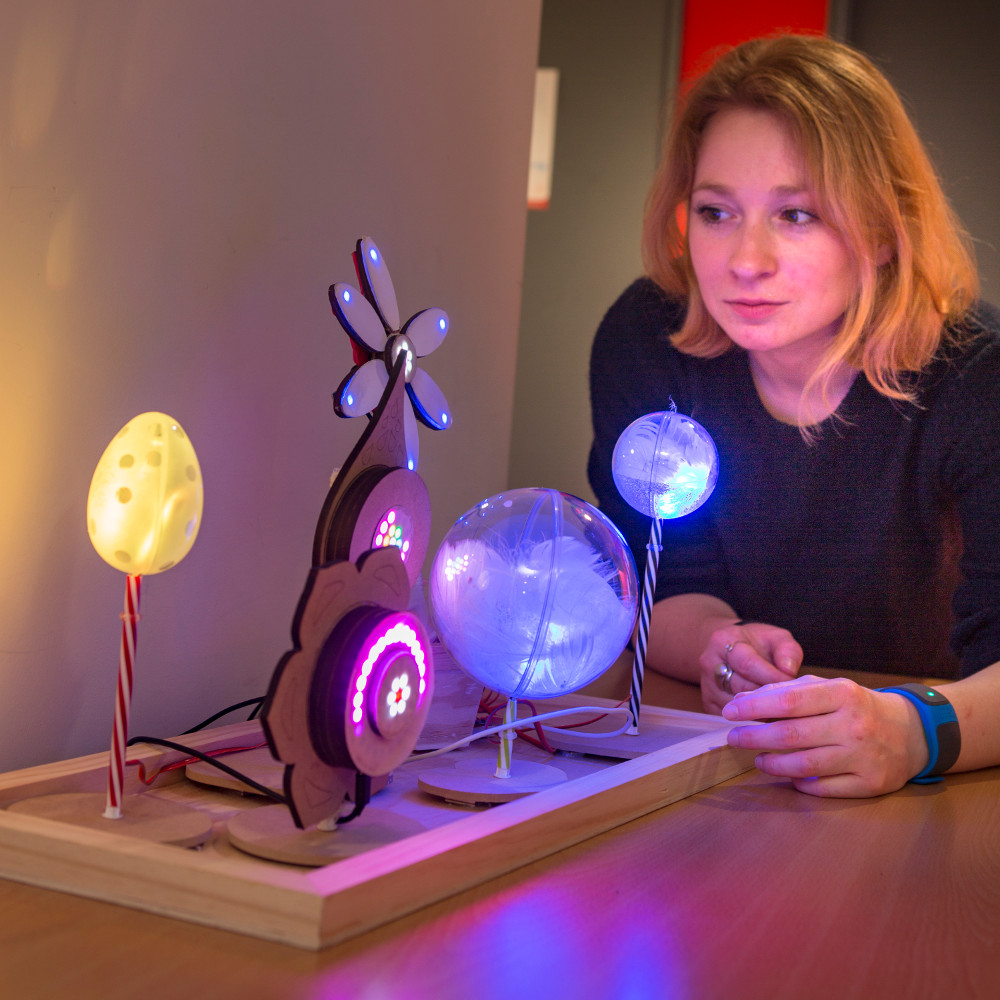
Coral was created (or “blobs”, “totems”, “physio-bricks”, “physio-stacks”… names were many) to implement those requirements. In particular, bricks were made:
Atomic: each brick should perform a single task.
Explicit: each task should be explicitly listed.
Explicable: the inner behavior of an element should be understandable.
Specific: each element capabilities should be restricted to the desired behavior, and unable to perform unexpected actions.
Doubtable: behaviors can be checked or overridden.
Extensible: new behaviors should be easily supported, providing forward compatibility.
Simple: As a mean to achieve the previous items, simplicity should be prioritized.
Inexpensive: to support the creation of diverse, specific elements, each of them should be rather low cost.
For example, in order to keep the communication between atoms Simple and Explicable, we opted for analog communication. Because no additional meta-data is shared outside a given atom unless explicitly stated, the design is Extensible, rendering possible to create new atoms and functionality, similar to the approach used for modular audio synthesis. A side effect of analog communication is its sensitivity to noise: we accepted these as we consider the gain in transparency is worth it. It can be argued that this approach leads to a naturally degrading signal (i.e. a “biodegradable biofeedback”), ensuring that the data has limited life span and thus limiting the risk that it could leak outside its initial scope and application. Going beyond, in order to explicitly inform users, we established labels to notify them what type of “dangerous” action the system is capable of performing. A standard iconography was chosen to represent basic functions (e.g. floppy disk for storage, gears for processing, waves for wireless communication, …). We consider that, similar to food labeling that is being enforced in some countries, users should be aware of the risks involved for their data when they engage with a device, and thus being able to make an informed decision. On par with our objectives, everything is meant to be opoen-source, from the code to the schematics to the instructions — we just have to populate the holder at https://ullolabs.github.io/physio-stacks.docs/.
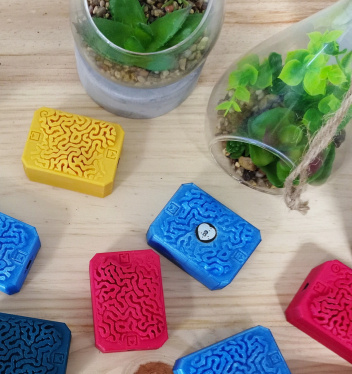
Over the last two years [as of 2021] we already performed several tests with Coral, on small scales, demoing and presenting them to researchers, designers or children (more details in Mobile HCI ’20 paper below). The project is also moving fast in terms of engineering, with the third iteration of the bricks, now easier to use and to craft (3D printing, soldering iron, basic electric components). While the first designs were based on the idea of “stacking” bricks, the latter ones explore the 2D space, more alike building tangrams.
v1, stacking
v2, Coral
v3, pogo connectors
This tangible, modular approach enable the construction of physiological interfaces that can be used as a prototyping toolkit by designers and researchers, or as didactic tools by educators and pupils. We are actively working with our collaborators toward producing a version of the bricks that could be used in class, to combine teaching of STEM-related disciplines to benevolent applications that could favor interaction and bring well-being.
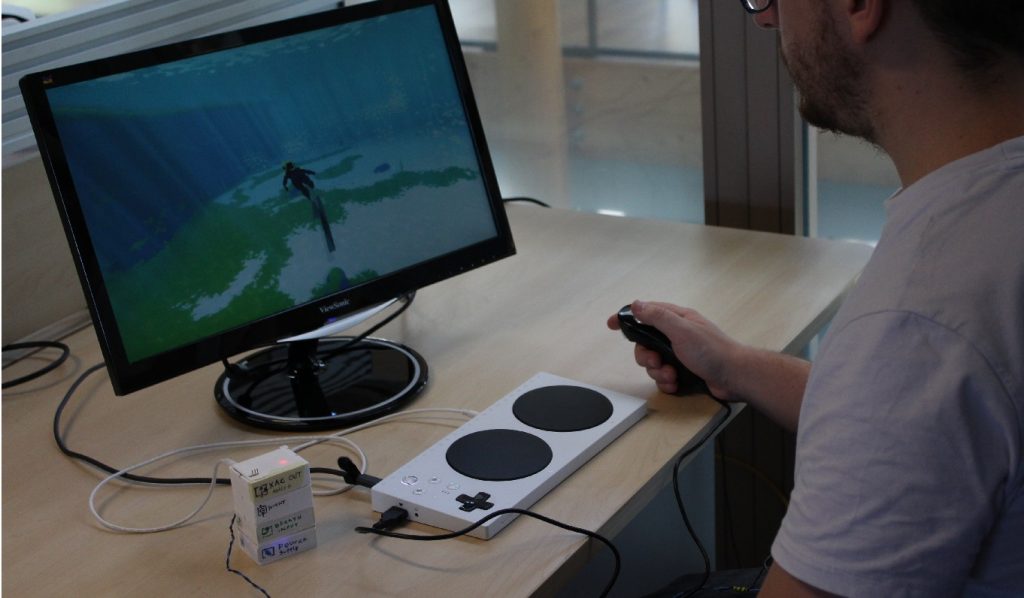
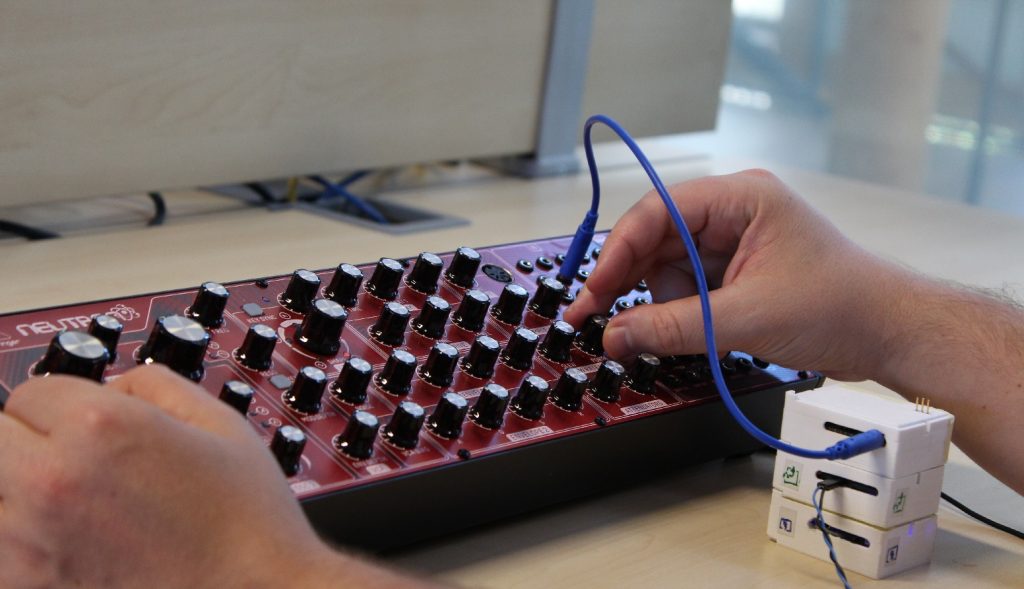
We are also very keen interface the bricks with existing devices. Since the communication between bricks is analog it is directly possible to interact with standard controllers such as the Microsoft Xbox Adaptive controller (XAC), to play existing games with our physiological activity, or to interact with analog audio synthesis.
Coral connected to Microsoft XAC
Coral connected to Behringer Neutron audio synthesizer
Our work was presented at the Mobile HCI ’20 conference, video below for a quick summary of the research:Our work was presented at the Mobile HCI ’20 conference, video below for a quick summary of the research:
Contributors
In the spirit of honest and transparent communication, here is the list of past and current contributors to the project (by a very rough order of appearance):
Joan Sol Roo, Renaud Gervais, Thibault Lainé, Pierre-Antoine Cinquin, Martin Hachet, Jérémy Frey. Physio-Stacks: Supporting Communication with Ourselves and Others via Tangible, Modular Physiological Devices. MobileHCI ’20: 22nd International Conference on Human-Computer Interaction with Mobile Devices and Services, Oct 2020, Oldenburg / Virtual, Germany. pp.1-12, ⟨10.1145/3379503.3403562⟩. ⟨hal-02958470⟩. PDF
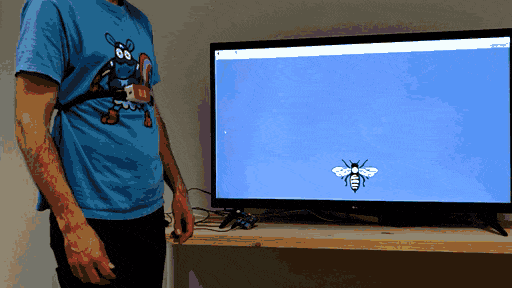
Breeze is a research project conducted in collaboration with the Magic Lab laboratory from Ben Gurion University (Israel). Breeze is a necklace pendant that captures breathing from one user while conveying their breathing patterns to a paired pendant worn by another user.
The seed of this project was planted during the development of Echo, when we started to envision scenarios of biofeedback applications involving multiple users. One form factor that we considered as a follow-up of the Echo avatar was a wearable, that we could more easily bring with us and use in everyday life situations. In Breeze first prototypes the feedback was only conveyed through lights, but over the course of the project we added two other modalities, vibrations and sounds. The rationale behind is to let user choose the feedback depending on the context of use — notably social context. For example a breathing biofeedback through sounds can be shared with people around, while vibrations could be perceived only by the person wearing the pendant. Early-on, we also integrated sensing in the pendant, measuring breathing thanks to an inertial measurement unit. The final pendant is meant to increase connectedness by creating a new communication channels between relatives. It can also serve as a non-intrusive sensor that accounts for new features of breathing, correlated with emotions.
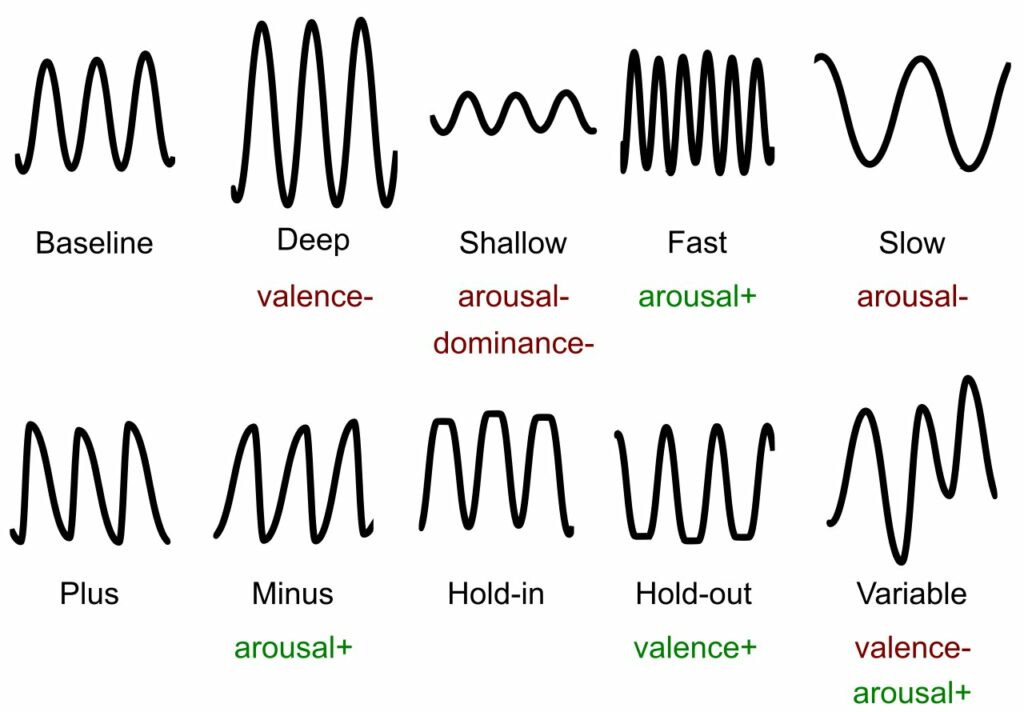
The presentation of the paper at CHI ’18 was recorded in the video below. (If you have the patience to watch until the questions, to answer one that caught me off guard and haunted me ever since: the fact that in the lexicon an increase in amplitude is not associated with a perceived increase in arousal can be explained by the fact that here we tested separately each breathing feature, whereas in a typical fight of flight response most often breathing rate and amplitude increase at the same time).
Something we did not describe in the published paper: Breeze contains an additional mode, the “compass”. What happens if someone removes the pendant from their neck? Because of change in absolute orientation, we can detect such event and signal to the wearer of the paired pendant that there is a good reason why the breathing biofeedback stopped. Then this partner could hold their own pendant on the horizontal, which now acts as a compass: the feedback will change not depending on the breathing rate of the partner, but depending on their location. Light changes when pointing Breeze toward the paired pendant and both pendants vibrate when users are face to face… even thousands of kilometers apart. Your loved one became your North, a nice touch for those living apart. More than just a gimmick, this is actually another way to mediate communication through the pendant, another layer of interactivity so that users can choose what information they want to share. A mode that probably should become its own project.
In a lab study, we investigated up to which point users could understand and interpret various breathing patterns when they were conveyed through the pendant. We showed how people associate valence, arousal and dominance with specific characteristics of breathing. We found, for instance, that shallow breaths are associated with low dominance and slow breathing with low arousal. We showed, for the first time, how features such as inhalations are associated with a high arousal and unveiled a “lexicon” of breathing features. This latter result is still overlooked in the HCI context the publication took place, but we believe that breathing patterns hold a huge potential to account for inner states. While most research in physiological computing only extract a breathing rate, there is much more in terms of features (amplitude, but also pauses between breaths, difference between inspiration time and exhalation time, etc.). Breathing is actually hard to properly measure. The features we unveiled could not be inferred from heart rate variability for example, they require a dedicated sensor. Surprisingly, we also found out during the study that participants intentionally modified their own breathing to match the biofeedback, as a technique for understanding the underlying emotion. This is an encouraging result, as it paves the way for utilizing Breeze for communication.
The next phase of the project will be two-folds. On the one hand, we hypothesize that wearable technology can be used to monitor a person’s emotional state over time in support of the diagnosis of mental health disorders. With new features that can extract from breathing with a non-intrusive wearable, we plan to conduct longitudinal studies to compare physiology with a mental health index. On the other hand, we are also very much interested in studying how Breeze as an “inter-biofeedback” could alter the relationship between two persons. He would like to investigate how Breeze could increase empathy, by giving pendants to pairs of users for several months. These studies come with their own technical challenges and their supervision require an important involvement. We are on the look-out for partners or calls that could help push in these directions.
Associated publications
Jérémy Frey, Jessica Cauchard. Remote Biofeedback Sharing, Opportunities and Challenges. WellComp – UbiComp/ISWC’18 Adjunct, Oct 2018, Singapore, Singapore. ⟨10.1145/3267305.3267701⟩. ⟨hal-01861830⟩. PDF
Jérémy Frey, May Grabli, Ronit Slyper, Jessica Cauchard. Breeze: Sharing Biofeedback Through Wearable Technologies. CHI ’18 – SIGCHI Conference on Human Factors in Computing System, Apr 2018, Montreal, Canada. ⟨10.1145/3173574.3174219⟩. ⟨hal-01708620⟩. PDF
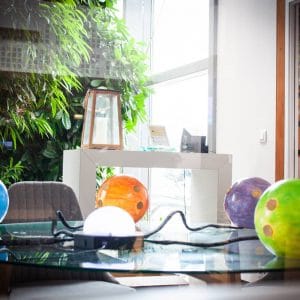
Cosmos is a shared experience where multiple users can observe a biofeedback of their heart-rate activity, displayed on a large screen.
To each user is associated a(n archetypal) heart that is wandering in space. The heart rate defines the position of the heart symbol on a diagonal from low to high while the heart rate variability will make the heart wander up and down. This playful visualization is simple and yet effective to account for different features associated with heart rate. More importantly, beyond giving information about each individual, Cosmos in the background is constantly computing various metrics related to the synchronization between users. Events are triggered in the environment depending on the similarities that are extracted from all heart rates. For example, a correlation between two heart rates will display rainbows launching from one heart to the other, while a cluster of hearts (similar heart rates and heart rate variability) will provoke an avalanche of shooting stars and the cutest sounds you will ever hear. Cosmos prompts for introspection (take control of one’s heart) as well as for interaction among users (trigger events by joining efforts). It is also a good support to explain the physiological phenomenon associated with heart rate activity, the link between physiology and cognition or the natural synchrony that can occur between people.
We had the opportunity to showcase Cosmos during many public exhibitions. More that once, we observed how relationships could shift when a user was facing their heart rate and how it related with others’. People question what is happening and they would start various activities to try to control their hearty avatar; relaxation, physical exercises or social interactions… in various forms, often without realizing that their is still a world outside the experience. The kawaii factor® does help to lift anxieties linked to “exposing” oneself through biosignals. Playfulness prevails then, which in turns open the door to unique interactions, even between strangers.
On the technical side, because (for once) Cosmos does not rely on any specific object, it can be quickly setup. We can also interface it with most devices measuring heart rate (there is a standard bluetooth BLE connectivity in the industry), hence we can envision scenarios involving large group of users — we tested up to twelve at the moment. To study the impact of such biofeedback at the level of the group, Cosmos will have its own research in due time.
Echo is meant to be you tangible avatar, representing in real time your physiological signals (breathing, heart-rate, …) as well as higher-lever inner and mental states (cognitive load, attention level, emotions, …). This is somehow a tangible “out-of-body experience”, hence “Tobe”, the first name of the project back when it was a research project in the Potioc research team at Inria Bordeaux. Echo was not the first avatar we built, though. Before it was Teegi, which was specifically aimed at showing brain activity — a more focused projects, aimed at learning as much as introspection, that went on on its own.
Through Echo, users can observe and interact with what occurs within. In addition, part of the research consist in finding ways to let users shape their avatar, customizing it to increase identification. With the first version, which relied on spatial augmented reality (SAR, projector to display any graphics, external tracking system to project right onto the puppet), users could choose in which way they would represent their inner states. For example they could pick and draw on a dedicated device the color, size or form of their heart, and even animate their heart rate however they saw fit. Echo is conceived and 3D printed from scratch; tedious process for mass production but more flexibility when it comes to adjust shape and size to users’ liking. If it started as a cumbersome SAR setup, Echo ended up as a self-contained object with embedded display and computational unit, nowadays ready to shine with the flick of a switch.
We were able with Echo to investigate for the first time a shared biofeedback between pairs of users, back in 2014, with shared relaxation exercises. Among the other use cases we imagined for echo: a display that could re-enact how you felt along side the picture of a dear souvenir; an avatar representing a loved one remotely (scenario that since then we pushed through Breeze; or a proxy that could help people with sensory challenges to communicate with those around (e.g. autism spectrum disorder). This latter scenario is one of the applications we anticipate the most.
We are currently running a study, a two-users scenarios, where we want to formally assess up to which point an avatar such as Echo could alter the perception people have of one another. We hypothesize that communicating through physiological signals with such interface could create an additional layer of presence when to people meet and share a moment.
Even though Echo is still mostly a research project at the moment, several of them already lives outside of Ullo, up to Japan and Creact headquarters, where they are meant to be used in education context.
Additional resources: repository hosting the first version of Echo, the spatial augmented version based on visual programming language for both the rendering (with vvvv) and the processing (with OpenViBE): https://github.com/introspectibles. Personal page of Renaud Gervais, the other father of this first version.
Associated publications
Renaud Gervais, Jérémy Frey, Alexis Gay, Fabien Lotte, Martin Hachet. TOBE: Tangible Out-of-Body Experience. TEI’16 –ACM Conference on Tangible, Embedded and Embodied Interaction, 2016. ⟨10.1145/2839462.2839486⟩. ⟨hal-01215499⟩. PDF
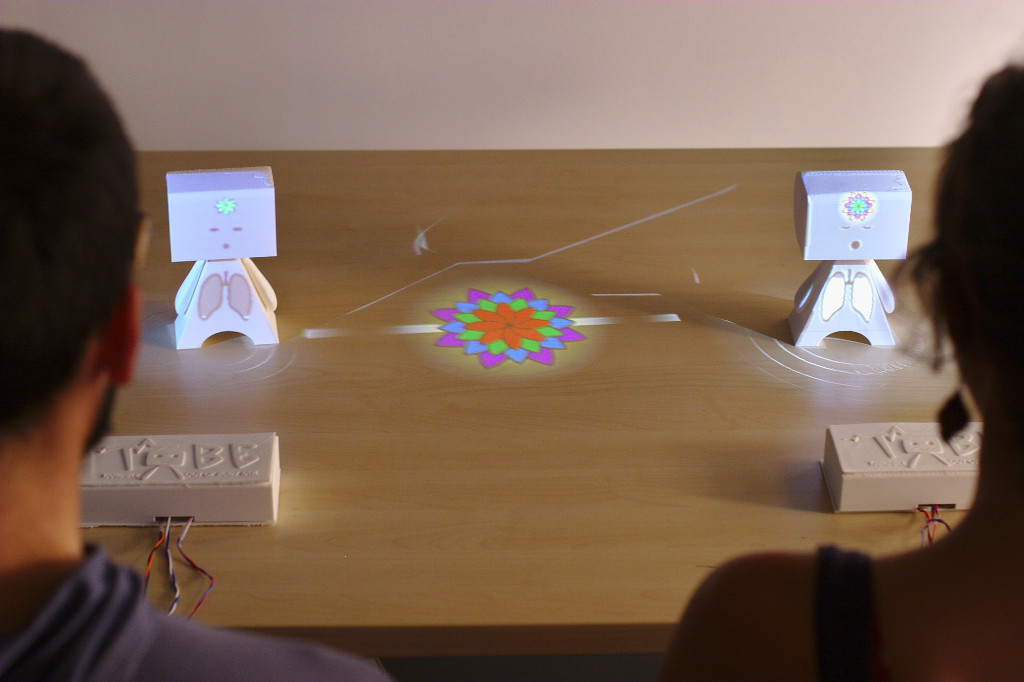
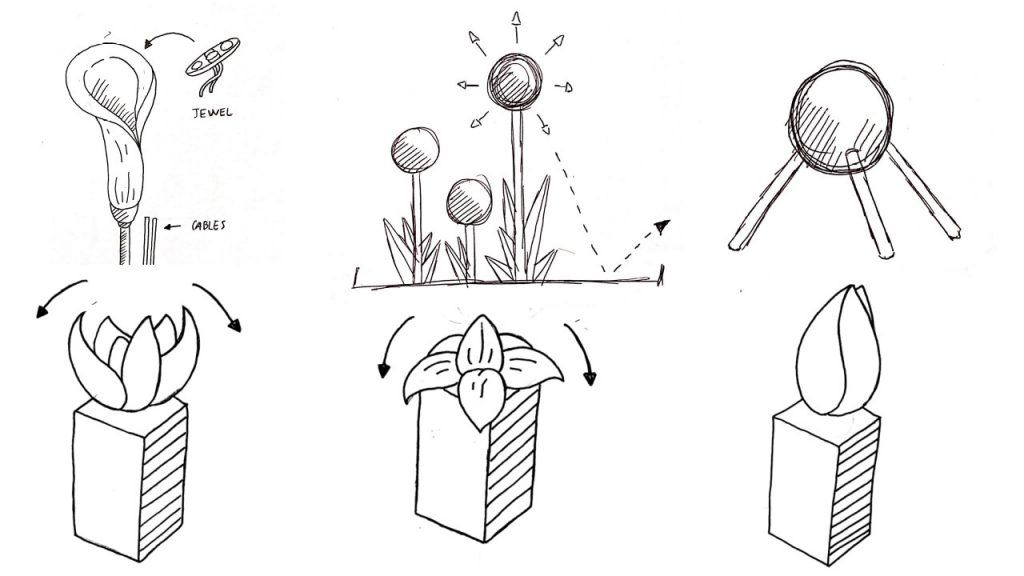
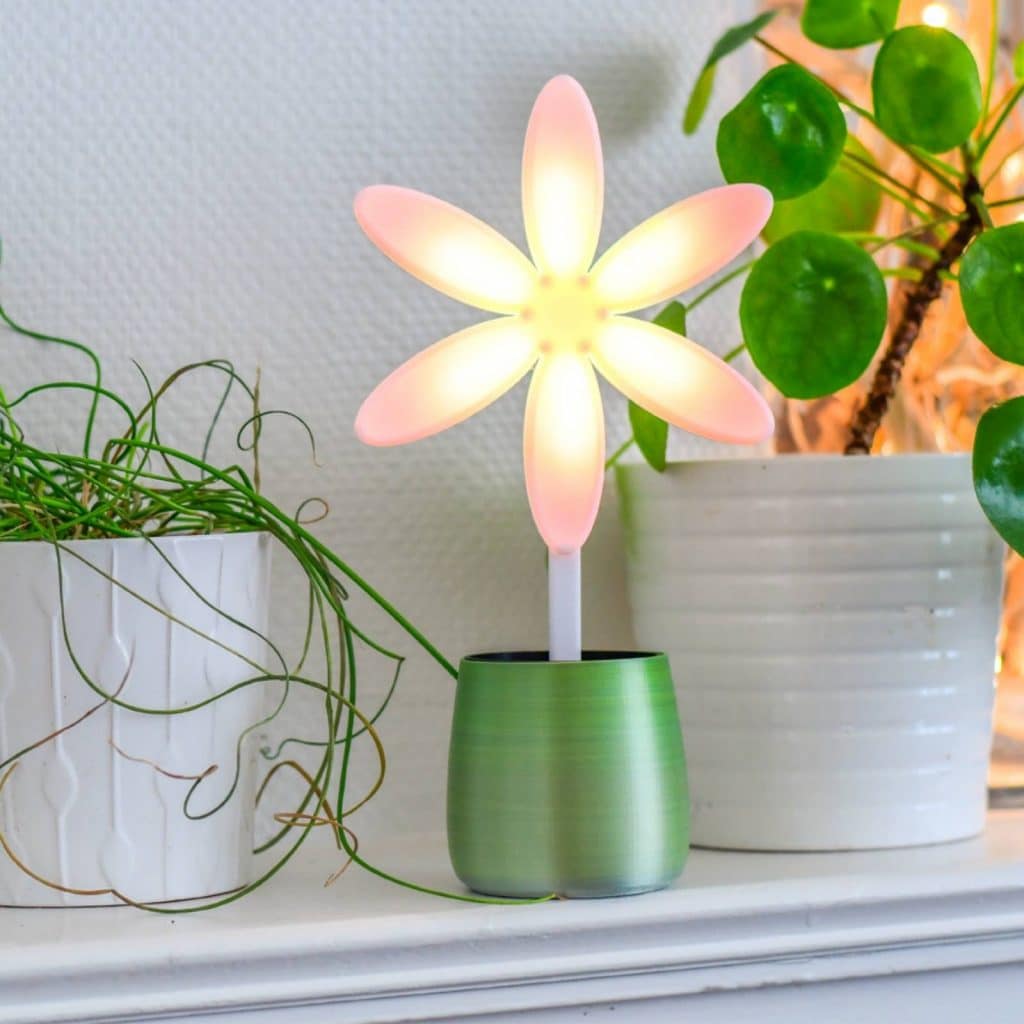
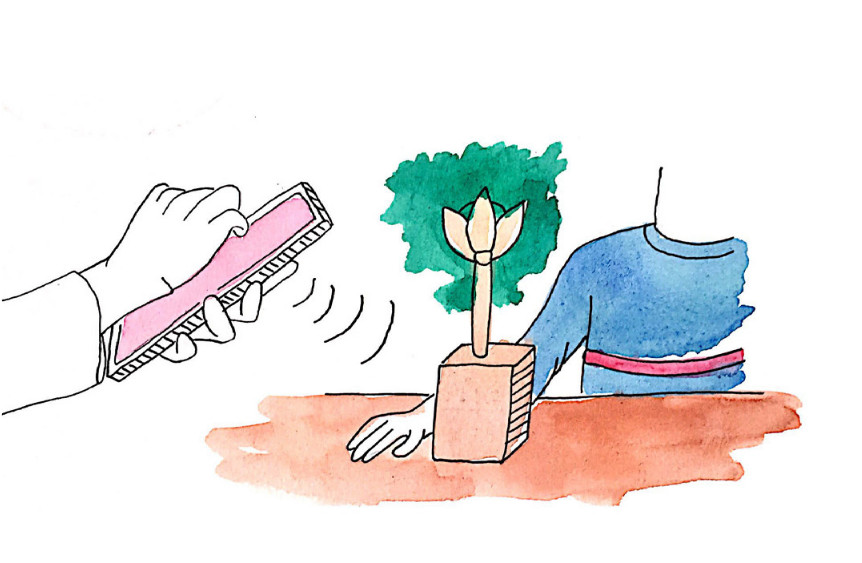
Flower is a device specifically aimed at providing breathing exercises. Patterns with different paces and colors are shown on the petals, that users can sync with. The main use-case is to use it as a way to reduce anxiety, when users choose to take a break. It is also envisioned as ambient device operating in the peripheral vision, with the slow pulsating light gently guiding users, without intruding into their routine. While we envisioned various designs at the beginning of the project, before the name settled, in the end a “flower” as a form factor is reminiscent of a plant next to which one would breathe in in order to smell it.
When the Flower is connected to a smartwatch, the breathing guide adapts to users, speeding up slightly when heart rate is higher, slowing down when heart rate is lower. This is on par with existing literature around the physiological phenomenon of cardiac coherence (in a nutshell: heart rate variability synced with breathing). There is indeed not one breathing to rule them all, and users benefits from adapting the breathing guide to their taste and physiology in order to provide a more effective guide.
To this day tow studies took place. One occurred in a replica apartment in order to assess its usability and how people would appropriate the device. The second study assessed the effect of the device when stressors were presented to participants, collecting along the way subjective measures, performance metrics and markers extracted from heart rate variability. In the associated paper we describe how the design of the Flower was praised by users and how it can reduce symptoms of stress when users focus their attention on it, as well as increase performance on a cognitive task (N-back). We did attempt to investigate whether an ambient biofeedback could alleviate stress, however this other experimental condition did not yield any significant difference compared to a sham feedback — most probably because an ambient feedback take a longer than mere minutes before it could be effective.
At this stage a couple dozens devices are being used by various people, including therapists that integrated the device in their practice — more information about this version on the company’s website. Beside providing breathing exercice, a second usage that emerged from the field consists in using the Flower as a timer, to orchestrate the day for people suffering from disorientation. We are actively working toward a second iteration that would offer more interaction when it is being manipulated and that could be mass-produced. At the same time we are building a platform that could help stimulate interactions between users and that could be used to gather data for field studies. We are also considering use-cases where one Flower could serve as a biofeedback for a whole group, the color changing depending on the overall heart rate variability.
Associated publications
Morgane Hamon, Rémy Ramadour, Jérémy Frey. Exploring Biofeedback with a Tangible Interface Designed for Relaxation. PhyCS – International Conference on Physiological Computing Systems, Sep 2018, Seville, Spain.⟨10.5220/0006961200540063⟩. ⟨hal-01861829⟩. PDF
Morgane Hamon, Rémy Ramadour, Jérémy Frey. Inner Flower: Design and Evaluation of a Tangible Biofeedback for Relaxation. Physiological Computing Systems, Springer, Cham, 2019.⟨10.1007/978-3-030-27950-9_8⟩. PDF
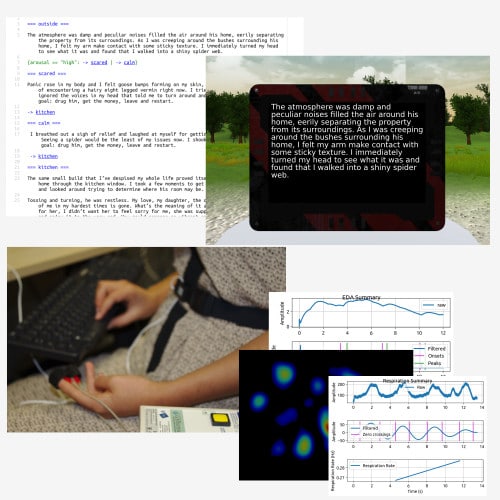
Did you ever get lost while reading a book, living through the characters and the events, being transported over the course of a story in a foreign world? What if such written universe could evolve depending on you; the text reacting discretely when your heart is racing for of paragraph of action, or when your breath is taken away by the unexpected revelation of a protagonist?
This is a project about an interactive fiction fueled by physiological signals that we hereby add to our stash. While there was hints of a first prototype published four years prior, the current version is the result of a collaboration with the Magic Lab laboratory from Ben Gurion University, Israel. We published at CHI ’20 our paper entitled “Physiologically Driven Storytelling: Concept and Software Tool”. We received there a “Best Paper Honorable Mention”, awarding the top 5% of the submissions — references and link to the original article at the bottom.
Beyond the publication and the research, we wish to provide to writers and readers alike a new form of storytelling. Thanks to the “PIF” engine (Physiological Interactive Fiction), it is now possible to write stories which narrative can branch in real time depending of signals such as breathing, perspiration or pupils dilatation, among others. To do so, the system combines a simplified markup language Ink, a video-game rendering engine (Unity) and a robust software to process in real time physiological signals (OpenViBE). Depending on the situation, physiological signals can be acquired with a laboratory equipment, as well as with off-the-shelf devices like smartwatches or… with Ullo’s own sensors.
Interactive fiction’s origin story takes place in the late 70s, a time during which “Choose Your Own Adventures” books (and alike) emerged alongside video games that were purely textual. In the former one has to turn to a specific page depending on the choice made for the character; in the latter, precursors to adventures games, players have to type on the keyboard simple instructions alike OPEN DOOR or GO NORTH to advance in the story — one of the most famous game: Zork, by Infocom. (Zork, that I [Jeremy] must confess never being able to finish, unlike jewels such as A Mind Forever Voyaging or Planetfal, developped by the same company). More detailed story in the paper. Here to explicit interaction from the reader we substitute implicit interaction, relying on the physiology, with a pinch of machine learning to understand signals’ evolution depending on the context. Transparent for the reader, and no need to wield a programming language complex to learn for the writer, but a light syntax quick and easy to grasp.
If the vision — which is not without resemblance to elements that one can find in science-not-so-fiction-anymore work such as The Ender’s Game or The Diamond Age — is ambitious, the project is still in its infancy. Yet, two studies on the menu for the first published full paper. In one we investigate the link between, on the one hand, proximity of a story with the reader and, on the other hand, empathy toward the character. In the other study we look at which information physiological signals can bring about the reader, with first classification scores on constructs related to emotions, attention, or to the complexity of the story. From there a whole world is to explore, with long-term measures and more focused stories. One of the scientific objectives we want to carry on is to understand how this technology could favor empathy: for example opening-up readers perspectives by helping them to better encompass the point of view of a character which seems definitely too foreign at first. One lead among many, and on the way awareness about all the different (mis)usages.
Beside this more fundamental research, during project’s next phase we expect to organize workshops around the tool. If you are an author boiling with curiosity, whether established or hobbyist — and not necessarily kin on new tech –, don’t hesitate to reach for us to try it out. We are also looking to build a community around the open-source software we developed, contributors are welcomed!
On the technical side, next we won’t deny ourselves the pleasure of integrating devices such as the Muse 2 for a drop of muscular and brain activity, or exploring virtual reality rendering (first visuals with the proof of concept “VIF” http://phd.jfrey.info/vif/), or creating narratives worlds shared among several readers.
For more information, to keep an eye on the news related to the project, or to get acquainted with the (still rough) source code, you can visit the dedicated website we are putting up: https://pif-engine.github.io/.
Associated publications
Jérémy Frey, Gilad Ostrin, May Grabli, Jessica Cauchard. Physiologically Driven Storytelling: Concept and Software Tool. CHI ’20 – SIGCHI Conference on Human Factors in Computing System, Apr 2020, Honolulu, United States.🏆 Best Paper Honorable Mention.⟨10.1145/3313831.3376643⟩. ⟨hal-02501375⟩. PDF
Gilad Ostrin, Jérémy Frey, Jessica Cauchard. Interactive Narrative in Virtual Reality. MUM 2018 Proceedings of the 17th International Conference on Mobile and Ubiquitous Multimedia, Nov 2018, Cairo, Egypt. pp.463-467, ⟨10.1145/3282894.3289740⟩. ⟨hal-01971380⟩. PDF
Jérémy Frey. VIF: Virtual Interactive Fiction (with a twist). CHI’16 Workshop –Pervasive Play, 2016. ⟨hal-01305799⟩. PDF
Pulse is an experience that we showcased first during the 2019 edition of the CES. With Pulse we wanted provide a moment where users can reflect not only on their heart rate, but also on the heart rates of those around, while retaining complete agency. We indeed brought back more control in the hands of the users; quite literally: thanks to ECG electrodes embedded in the spheres, the physiological measures only occur when users decide to grasp the device. Pulse involves three components. 1. The “planet”, that illuminates when users put their hands on it, starting to, you get it, pulse through light and vibration at the same pace of the heart rate. 2. The central “hub”, that gathers the heart rates of all users (up to four in current version), and that changes color accordingly to the synchronization it detects among them. 3. Finally the cable, also called… actually we don’t have yet a good name for it, but nonetheless it does more than conveying electrical signals and information: you can observe pulses of lights that accompany each heartbeat from the planets to the hub. Beyond pleasing the eye, that the cable explicitly conveys signals is also a way to remind users about what is going on behind the curtain.
Pulse was conceived in collaboration with the Potioc team at Inria; in particular Thibault Lainé and Joan Sol Roo, who worked on the very first proof of concept (sensors + the… cable). Current design would not be complete without the craft of Alexis Gay from GayA concept, who carefully transformed white blobs in shiny planets and helped to refine the user experience.
Due to its modular nature and “hands-on” approach, Pulse shares similarities with our Coral. More than what meets the eye at first: thanks to analog output here as well we can connect the hub to other gear. As such we built for the CES a device that converts analog signals to the MIDI protocol; a device (yet to have its own page) that in turns we connected to a sequencer and synthesizer, the teenage engineering OP-Z. As a result: a soundtrack that speeds up or down depending on the group average heart-rate, and notes and chimes triggered by each heart beat. Space does sound at times.
Because light, vibration and music was not enough, Pulse’s hub can also act as a (Bluetooth) sensor to connect the group to our Cosmos, to create an even more engaging experience. By merging these different moralities and projects, we are building a whole universe that revolves around participants.
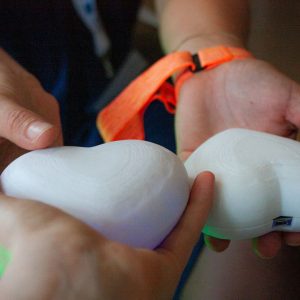
Imagine holding in your hand an enclosure shaped as a heart, that is pulsating through lights and vibrations at the same pace of your own heart. Classic biofeedback. Now picture giving it to someone in front of you: we assure that the words “take this, this is my heart” has quite an effect on visitors during an exhibition. This is Vibes, the tangible biofeedback you hold onto, that you can share, exchange, feel and make feel. Among the use cases we envision with Vibes: send your heart rate (i.e. your vibes) to someone far away, to remind them that you think about them. For the moment we can easily switch the signals between pairs of devices, to have users comparing their rhythms one with another.
Two persons exchaging their heart-rate through Vibes
In the next iteration we will improve the haptic feedback. While vibration motors give satisfactory results to mimic a beating heart, we are in the process of integrating novel actuators, which versatility enables to explore any dynamic (think tiny boomboxes in the palm of the hand).
Vibes is still at an early stage, and yet we witnessed first hand how giving away a pulsating heart — even a nice-looking one — has an immediate effect on users. There is intimacy involved. Interestingly, often people would compare the pace of Vibes to the one that can they can measure themselves, placing for example a finger on the jugular. We observed these situation occurring more frequently that with our other biofeedback devices. People tends to underestimate the pace of their heart rate; maybe because of the proximity between the representation and the actual phenomenon, any perceived discrepancy might prompt for investigation (still on the right side of the uncanny valley?). This relationship between representation and effectiveness is still an hypothesis, one that we hope to investigate in the future.


